Git with the Git menu
Now we’ve connected to Git, we can use it to version control. How does Git do this?
To make file or code changes without impacting working code already on the repository, we make separate “copies” of the repository code, called branches.
The
mainbranch is the main branch that contains all the most up-to-date and tested codeEvery time you want to add a new feature or test code, you make a new branch
The new branch contains all of the code from
main, but any changes made to that branch do not affectmainOnce you are confident your changes are working, you can request to add your changes back to
mainin a Pull Request (covered in a later section of the guide)
Creating new branches to work from follows one of the key principles of code contributing. It is considered good practice to keep any new work separate so it can be tested and reviewed before it is published.
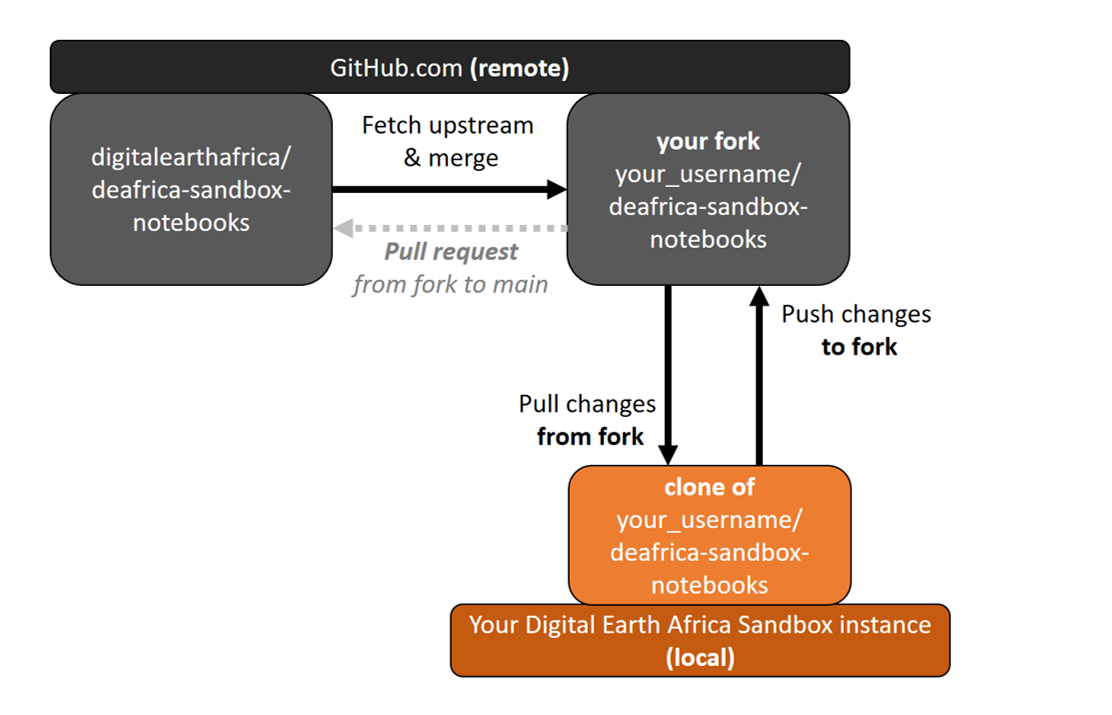
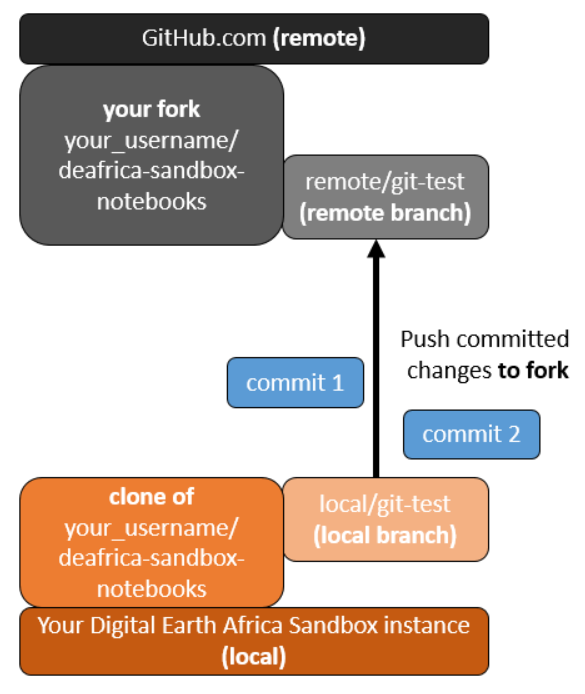
This section covers how we make and get changes on the repository. A simplified diagram of our current remote and local entities are shown in the diagram above.
Check your fork is up to date
The quickest way to check your fork is the latest version of the original repo is by going to your GitHub account and looking at your forks. The fork URL might have a similar structure to:
https://github.com/<your_username>/deafrica-sandbox-notebooks
If your fork is behind, there will be a banner at the top of the page saying “This branch is XYZ commits behind digitalearthafrica:main.” An example is shown in the image below.

In this example, 12 changes, or commits, have been made by other people since the fork was last synced with the original.
To make them even again, click Fetch upstream, then select Fetch and merge. You can “pull” those new updates to your Sandbox clone using the Git menu in the Sandbox.
Access the Git menu
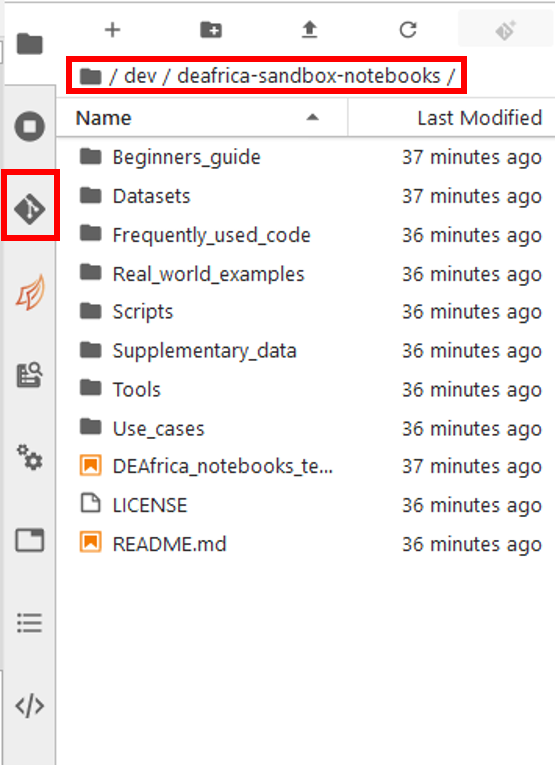
Open up the Sandbox and navigate to the folder of the
deafrica-sandbox-notebooksclone, in yourdevfolder. If you have not set up thedevfolder and repository clone yet, please follow the instructions in the previous section on connecting to Git.
Check the file path at the top of the folder sidebar is
/dev/deafrica-sandbox-notebooks/.
Click the Git icon on the sidebar menu. It is a grey diamond shape with two lines running through it. This will take you to the Git menu.
Git menu: a breakdown
The Git menu tells you about what repository you are editing and lets you access the most common Git version control functions. We will go through some of the buttons on the menu, and then show how they are used through a demo example you can try yourself.
Don’t be concerned if you are confused by all the menu items. Try the example exercise below: the concepts will make more sense when you use them.
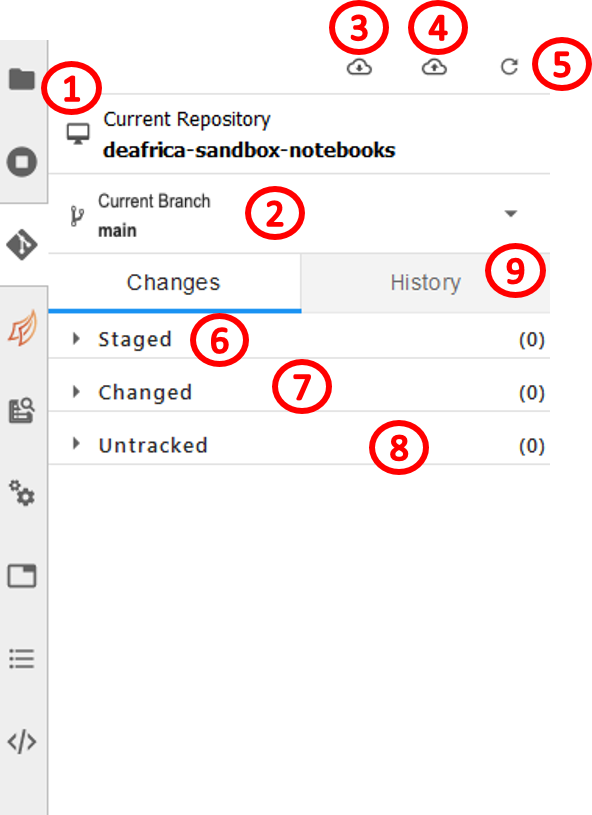
Current Repository: This tells me I am currently in my clone of
deafrica-sandbox-notebooks. By default (and convention) your clone will have the same name as its parent repository. The Current Repository is selected by whichever folder your File Browser is navigated to, which is why it was important to check your file path earlier.Current Branch: This tells me I am on the
mainbranch. Click the dropdown arrow to create a new branch, or view and select other branches.Pull latest changes: This performs a Git Pull. Changes to the remote version of this fork (for example, if you synced with the main through Fetch upstream earlier) will be pulled down to this clone on the Sandbox. > If you are not sure if you have pulled all recent changes to your clone, you should click this button now.
Push committed changes: When you have made changes to the local clone of the repository, you can send them to the remote version by “committing the change”, then “pushing”. The following example tutorial will demonstrate both those actions.
Refresh the repository to detect local and remote changes: Use this to check your menu is displaying the latest information.
Staged: Files listed here have been changed, and these changes are ready for confirmation, or commit. Committing will allow these changes to be pushed to the remote repo.
Changed: Files which are being version-tracked, and have been modified, will show up here. These changes are not yet committed, so they will not be pushed to the remote repo.
Untracked: These files are not being version controlled. They will not be part of the GitHub repo on any branch. Generally, new files are listed here. This is because Git doesn’t know yet whether the files are related to any of your branches.
Untracked files are only stored on your Sandbox memory. This memory is subject to upgrades and changes by Digital Earth Africa as per the Sandbox Terms and Conditions, which could affect your files. Important files should be backed up to at least one other location.
Git concepts
Branch: A copy of the repository. It contains all the code of the main branch, but can be edited without impacting the repo.
Commit: A “save” of your changes. It confirms these are the changes you want to make. Only committed changes can be pushed or pulled from repos.
Pull: Retrieves changes (commits) from the remote branch and copies them to the corresponding local branch.
Push: Sends commits made on the local branch to its corresponding remote branch. Push and pulls make sure local and remote versions of the same repo are up-to-date with each other.
Upstream: The term used to indicate the repo being tracked by your fork or clone. For instance, the original
deafrica-sandbox-notebooksrepo is upstream of your fork of that repo. Not every repo has an upstream entity. In the example tutorial below, we will make a branch in your repo clone, and set its upstream branch to one on your fork.
Tutorial: Use the Git menu to create a new branch and make changes
All the menu items and new concepts can be best understood by following this tutorial. We will use the sidebar Git menu to:
make a new branch;
add a file;
commit the changes; and
push the changes to the remote repo (your fork on the GitHub website).
Make a new branch
In the Git menu, select New Branch.

Name your new branch (here we will call it
git-test). For “Create branch based on…”, selectmain. This will create a branch which is an exact copy ofmain. Select Create Branch to create the branch.
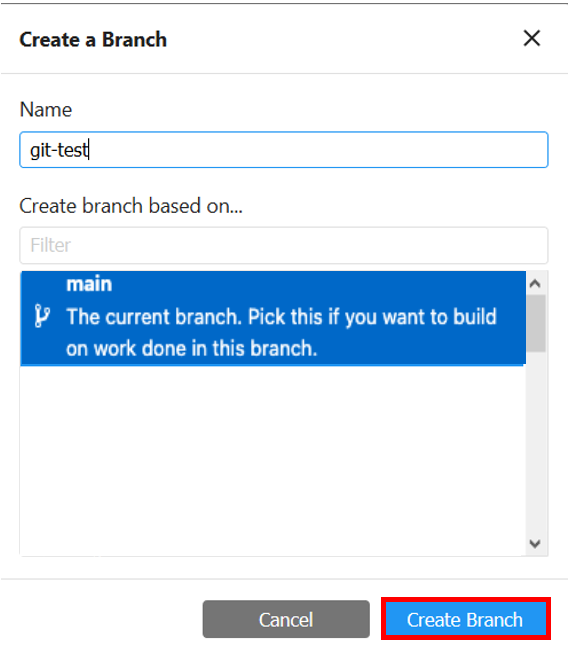
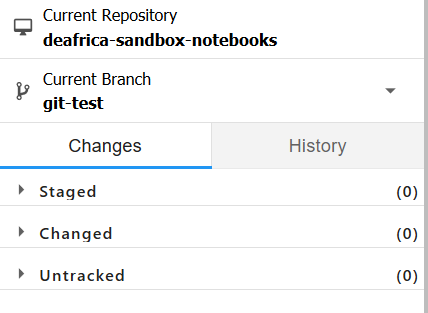
We will automatically be moved onto the branch. “Current Branch” should now say
git-test.
Add a new file
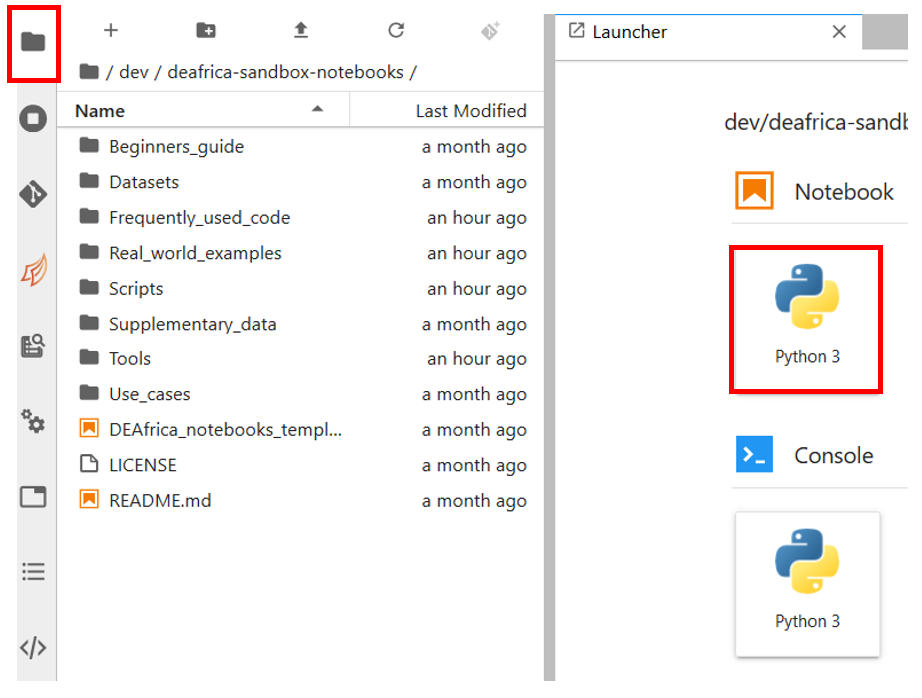
Select the folder icon to return to the Folder view. The files and folders will look exactly like they did before, because you just created a copy of the
mainbranch. Now we are going to change something. Click on the Notebook > Python 3 icon in the Launcher to make a new Jupyter Notebook file.
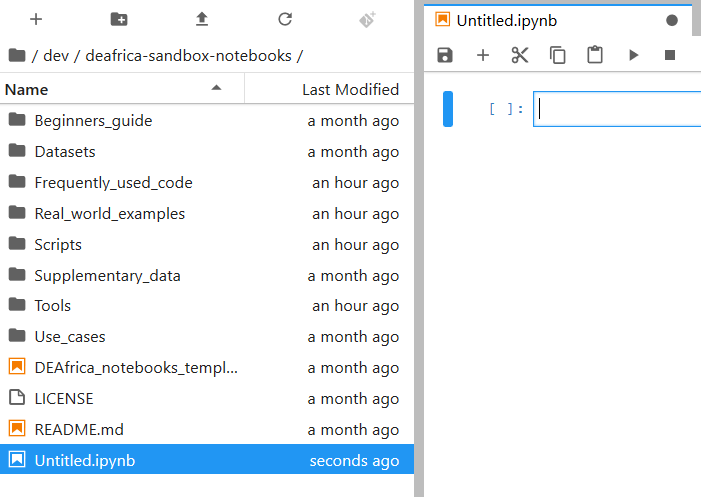
The file will automatically open.
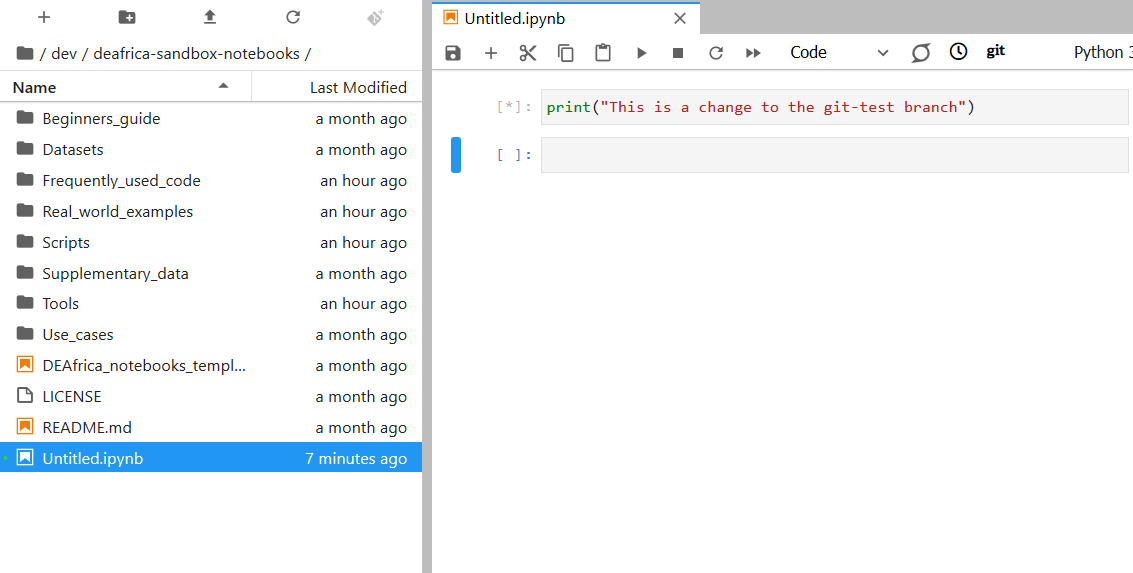
Type something in the first cell of the file. It’s okay if you don’t know any Python. In this example, we will enter
print("This is a change to the git-test branch"). Ensure the dropdown menu at the top of the file says “Code”. PressShift + Enteron your keyboard to execute the cell. This will print the text you entered underneath the code cell.
Let’s rename the file. Right-click on the file in the file browser and select Rename.
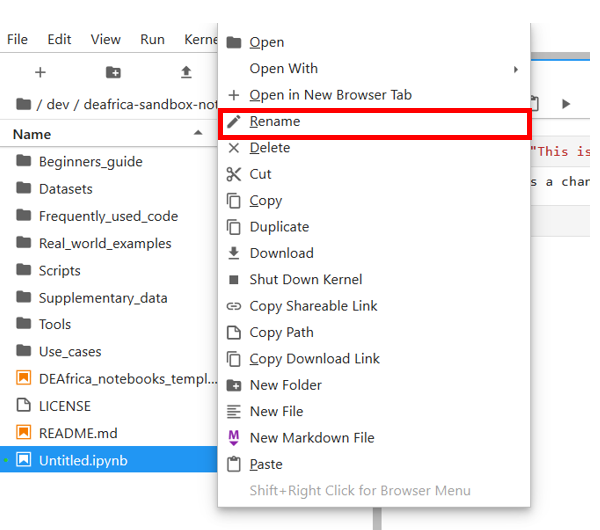
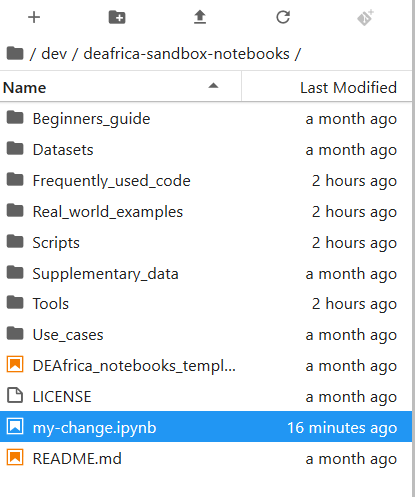
Type your new file name. Here we have called it
my-change. It has the file extension.ipynb.
Commit changes: track new files
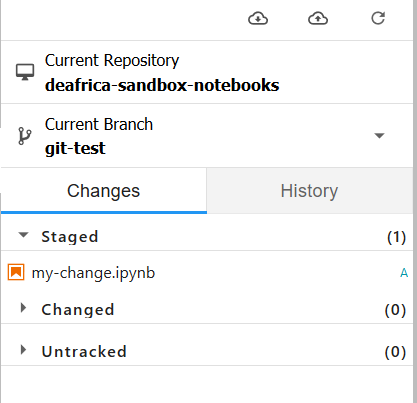
Go back to the Git menu. Now it will show one “Untracked” file - your new Jupyter Notebook file!
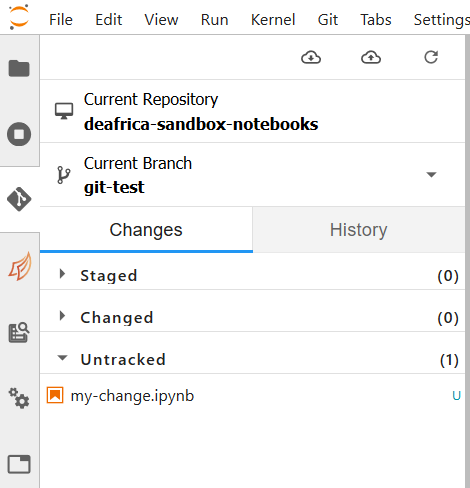
Hover over the file name with your mouse. A + symbol will appear on the right-hand side. Click +. This adds
my-change.ipynbto the “Staged” file list. This means this file is now tracked; all changes will be monitored. This is in preparation for changes to be added back to the repo.
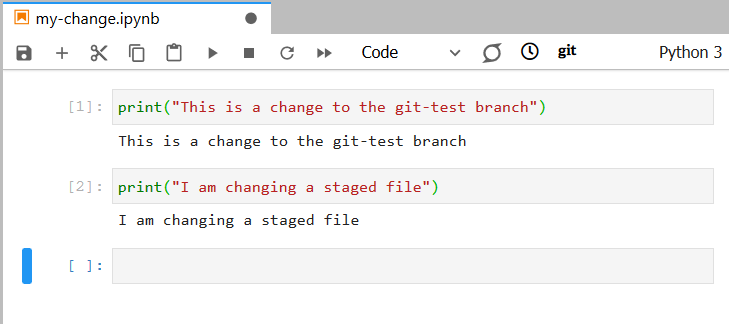
While the file is staged but the changes are not yet committed, you can still make edits to it. Go back to
my-change.ipynband add another line, likeprint("I am changing a staged file"). Now, the letter next to the staged file name has changed fromA(added) toM(modified).
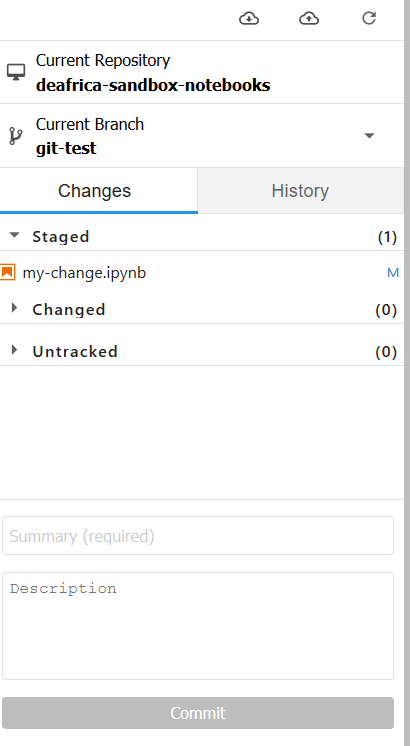
Let’s finalise all these changes (the original added file plus any modifications) by committing. Committing finalises any changes staged files so you can push the changes to your fork. Type a short summary of the changes made to staged files. For example, “Added my-change file.” Click Commit.

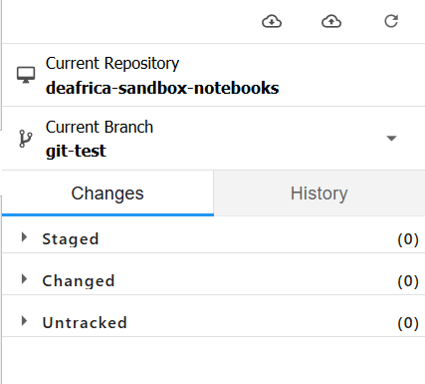
Committed changes are removed from the menu.
Commit changes: set upstream
We are almost there! Now we just need to tell our branch to push the commit to our fork. Remember, your changes are on your local clone of the repo, while the fork is remote on your GitHub account. We will first link our branch to a corresponding remote branch on the fork. They will track each other. When we push our locally commited change, it will go to its equivalent remote branch. If this is too confusing, don’t overthink it, just follow the steps.
Open a Terminal from the File Browser. Type in
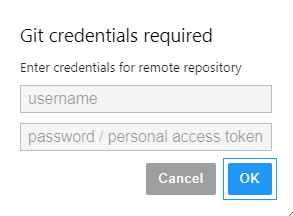
git push --set-upstream origin git-testand pressEnteron your keyboard. It will ask you for your Git credentials, enter them as prompted. In Terminal, when you are typing your password or Personal Access Token, the text cursor does not move but characters are being entered. For security reasons you must have set up GitHub multi-factor authentication; see the Connect to Git page for more information.

Success! You will see the message
Branch 'git-test' set up to track remote branch 'git-test' from 'origin'. Return to the Git menu.

Push committed changes
Return to the Git menu. Hit the icon Push committed changes. It looks like a little cloud with an up arrow inside. Enter your Git credentials as prompted and click OK.
Finally, we can check whether the changes went through. Go to your GitHub
deafrica-sandbox-notebooksfork page, which will have a URL similar tohttps://github.com/<your_username>/deafrica-sandbox-notebooks. Click the branch dropdown menu near the top of the page. Now, apart from justmain, you should also be able to see and selectgit-test.

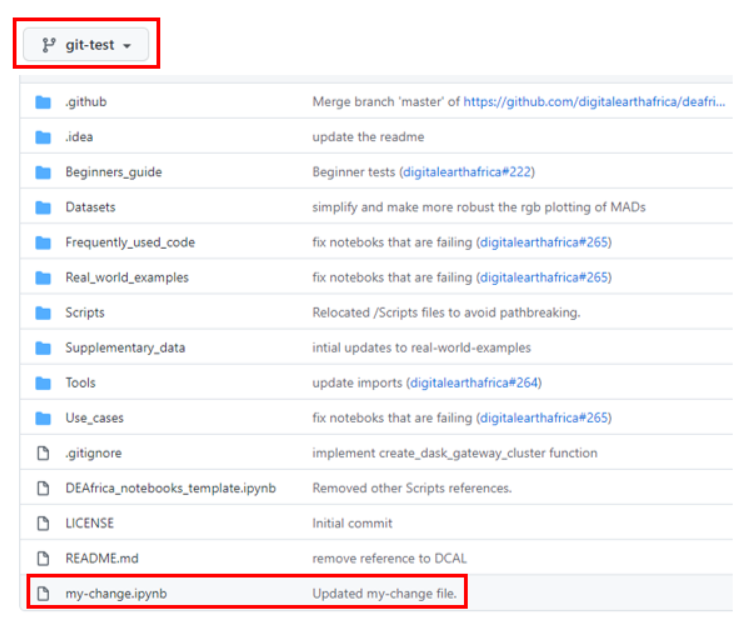
Notice that your new file my-change.ipynb is not listed on the main branch, but when you switch your view to the git-test branch, it appears. We have successfully made a change. Congratulations for making it through all of these steps.
Git checklist
Things to check when you log into the Sandbox and start working on your open-source code project:
Have you fetched and merged upstream so your fork is up-to-date with the original repository?
Which branch are you on? Is that the correct branch to be working from?
Have you pulled and merged the latest changes to your clone from your fork of the repository?
You can check the first item from your fork URL, and the second two by accessing the Git menu and looking at Current Repository and Current Branch.
Common issues
Unable to detect a Git repository. This can happen if you have not logged into Git on the Sandbox. Follow the instructions on connecting to Git. Secondly, check your File Browser is navigated to your clone folder. If it is in the Home page or just in the
devfolder, those aren’t GitHub repositories.I can’t find my file, but I know I made a new file. Are you on the correct branch? If you switch to a different branch, your new file may not appear if it has been tracked in a different branch. For example,
my-change.ipynbshould not be visible on themainbranch.I pushed my changes to my fork but I can’t see them on the GitHub website. Did you add and commit the files which were changed? Are you looking at the
mainbranch of your fork when your changes were actually on a different branch?mainis displayed by default on the website. Click the branch dropdown to see different branches on your fork.I am “XYZ number of commits behind ``digitalearthafrica:main``”. You have not fetched and merged the latest changes from the original repository. Click the Fetch upstream button on the fork’s GitHub webpage to fetch and merge the latest updates. Then, click the Pull button in the Sandbox to update your local clone. For minimum conflicts, this should be done before committing the changes and pushing to your fork.
Git is not accepting my Git password when credentials are requested. For security reasons, the Sandbox requires a Personal Access Token separate to your password, or another form of multi-factor authentication. They are simple to set up. See the official GitHub article and guide linked on the Connect to Git page.
Next steps
Experiment with making changes using the Git menu and become more familiar with how the file tracking works. Alternatively, continue on with the next part of the tutorial.
The Git menu gives users access to some of the more common Git functions. However, for full flexibility it is ideal to use the Git from the Sandbox Terminal. We already used the Terminal for some commands that could not be done through the menu. As it happens, all Git commands can be run through Terminal instead of clicking back and forth in the menu.
The benefits of Terminal include:
Access to the complete repertoire of Git commands
Better Git monitoring with the
git statuscommandMore control over file versioning, including reverting commits
Familiarity with command-line-like interfaces, which is useful for other non-Git administrative tasks in the Sandbox, and also applicable outside of the Sandbox
Less clicking around: everything you need can be done from Terminal
For coders or anyone with previous Terminal or command-line experience, this is the natural platform for you to use. If these concepts are new to you, don’t worry! They are uncomplicated to learn and we recommend trying it.
Click Next to continue.